Simple steps to keep your e-bike stopping smoothly:

Electric bikes are faster and heavier than regular bikes. This means your brakes work harder. Knowing when to replace your e-bike brake pads is key to staying safe.
Keeping your e-bike in good shape starts with knowing that brake pads wear out faster. The extra weight from batteries and motors makes stopping harder. Regular checks help identify issues before they become significant problems.
It's time to replace your e-bike brake pads when they are worn out. Shimano recommends changing them when the friction material is less than 1.5 millimeters. Waiting too long can lead to brake failure when you need it most.
Having strong brakes is even more important on e-bikes. You need to stop quickly in heavy traffic and on steep hills. Learning when and how to replace your e-bike brake pads keeps you safe and extends the life of your brakes.
Key Takeaways
- E-bike brake pads wear faster due to increased weight and speed compared to regular bikes
- Replace brake pads when the friction material wears down to 1.5mm thickness.
- Regular visual checks help spot wear patterns before brakes fail
- Listen for squealing sounds that signal pad replacement time
- Test brake lever feel during routine safety inspections
- Proper maintenance prevents dangerous situations in traffic or on hills
Understanding E-Bike Brake Pad Basics and Their Importance
Electric bicycles need strong brakes to control their weight and speed. They use special brake pads that can handle more force and heat than those used on regular bikes. Knowing your brakes is key to safe riding and stopping power.
Types of Brake Systems in Electric Bicycles
Most e-bikes feature disc brakes, which can be either hydraulic or mechanical. Each type uses different pads for different conditions:
- Resin/Organic Pads: These pads are quiet and strong, but wear out fast. They cost $15-$ 25 and work best in dry conditions.
- Metallic/Sintered Pads: These pads last longer and handle heat better. They cost $20-35 and are noisier than resin pads.
- Ceramic Pads: A premium option that's quiet and lasts long. They cost $30-50+.
Why E-Bike Brake Maintenance Matters for Safety
Keeping brakes in check prevents accidents and keeps them working well. It's essential to identify worn-out brake pads promptly. This ensures you can stop safely, whether in traffic or on steep hills.
How E-Bike Weight and Speed Affect Brake Pad Wear
E-bikes are heavier than regular bikes, weighing 40-70 pounds. Their motor-assisted speeds can reach 28 mph, making brake pads wear out faster. Heavy riders might need new pads every 500-700 miles, while lighter riders on flat ground might go over 2,000 miles.
Recognizing Worn Brake Pad Indicators on Your Electric Bike
Your e-bike's brakes need regular checks for safe riding. Spotting early signs helps avoid expensive fixes and risks. Knowing what to look for during electric bike maintenance helps catch problems early.
Visual Signs of Brake Pad Deterioration
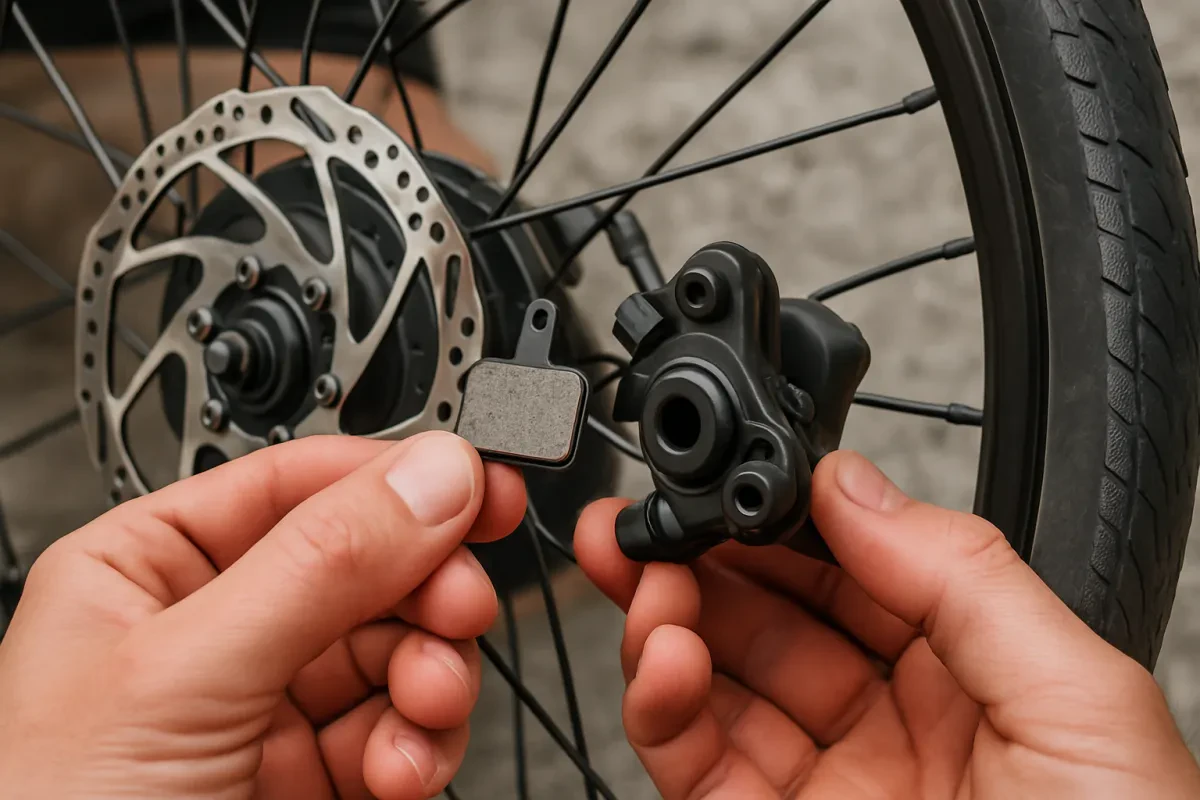
Regular checks show important info about your brake pads. Remove the wheel and inspect the pads. They should be 3-4mm thick when new. If they're under 1.5mm, it's time to replace them.
Look for three layers: the metal backing, the friction material, and how they meet the rotor. This helps you see if they're worn down.
Check for uneven wear on the pad. If it's not even, the caliper might need disc brake service. Shiny or glazed surfaces mean they're not working well. Dark spots or discoloration could mean oil or brake fluid contamination.
E-Bike Brake Squealing and Other Auditory Warnings
Listen to your brakes while riding. E-bike brake squealing means the pads are glazed or dirty. High-pitched squeaks often mean dust or debris on the rotor. Grinding sounds mean metal is touching metal - stop riding right away.
This is a serious problem that requires prompt electric bike repair to prevent rotor damage.
Changes in E-Bike Stopping Power and Performance
Notice how your brakes feel. Spongy or soft levers mean worn pads or air in the lines. If the lever takes a long time to engage, the pads are worn.
Brakes that shudder or pulse during stops typically indicate warped rotors or dirty brake pads.
| Symptom | Likely Cause | Action Required |
|---|---|---|
| Reduced stopping distance | Worn pads below 1.5mm | Immediate replacement |
| Lever pulls to handlebar | Extreme pad wear | Replace pads and bleed system |
| Inconsistent braking | Contaminated pads | Replace pads and clean rotors |
Oil contamination can ruin brake pads. Even skin oils can affect their performance. Always handle pads by their backing plates during brake pad thickness measurement and installation.
Essential Tools and Materials for Electric Bicycle Brake Replacement
Before starting any disc brake replacement on your e-bike, having the right tools is crucial. A basic toolkit costs under $30. It allows you to perform regular bicycle brake maintenance at home.
Start with a set of hex keys or Allen wrenches, which cost about $15. Most e-bikes require brake parts in 4mm, 5mm, or 6mm sizes. Nitrile gloves, which cost around $5 per box, protect your hands from brake fluid.
A piston press or pad spreader ($10-20) makes installation simpler. But a clean flathead screwdriver can also do the job.
- Rubbing alcohol for cleaning brake rotors and calipers
- Clean, lint-free rags to wipe away debris
- Needle-nose pliers for removing cotter pins on mechanical brakes
- Replacement pads specific to your brake caliper model
Professional bike shops charge $25-$ 50 per wheel for labor, plus the cost of the pads. DIY maintenance can save you money after just one or two services. Quality tools can last for years, making them a good investment for e-bike component longevity.
Always check brake pad wear indicators before buying new pads. Brake manufacturers use different styles and shapes. Write down your caliper model number or bring the old pads to find exact replacements.
When and How to Replace Your E-Bike Brake Pads
Keeping your e-bike brakes in top shape is key. It's not just about how many miles you ride. Instead, check them often to stay safe. This is because different places you ride can wear out your brakes at different rates.
Optimal Replacement Timeline Based on Riding Conditions
Where you ride affects how long your brake pads last. City riders stop frequently, while trail riders often deal with mud and dirt. So, check your brake pads regularly:
| Riding Conditions | Inspection Frequency | Average Pad Life |
|---|---|---|
| City Commuting | Every 200-300 miles | 800-1,200 miles |
| Mountain Trails | Every 150-200 miles | 500-800 miles |
| Mixed Terrain | Every 250 miles | 700-1,000 miles |
Step-by-Step Disc Brake Pad Replacement Process
Doing your own e-bike maintenance can save you money. Start by taking off the wheel. Then, find the pin or bolt that holds it in place. Never squeeze the brake lever with pads removed to avoid damaging the pistons.
Take out the old pads and clean the caliper with rubbing alcohol. Use a piston press tool to push the pistons back. Insert the new pads, ensuring the spring is correctly positioned, then reassemble everything. This should take about 15-20 minutes per wheel.
Mechanical Brake Service Procedures for E-Bikes
For mechanical brakes, you'll need a 5mm Allen key. First, remove the caliper bolt. Then, adjust the cable to ensure the brakes function properly. Always test your brakes in a safe area before riding.
Brake Pad Thickness Measurement and Safety Inspection Techniques
Regularly checking your electric bicycle's brakes is crucial for safe riding. You need to measure brake pad thickness to know when to replace them. Most people can do this at home with simple tools and some knowledge.
Using Calipers for Accurate Brake Pad Thickness Assessment
Digital calipers give the most accurate readings for your e-bike's brakes. Here's how to measure your brake pads:
- Remove the wheel to access the brake caliper
- Extract the brake pads carefully from their housing
- Place the caliper jaws across the friction material
- Record the measurement in millimeters
- Compare readings to manufacturer specifications
Use a flashlight to see the pads in the caliper. Inspect for uneven wear, cracks, or missing parts that may compromise stopping power. Taking photos before removal helps with correct reinstallation.
Manufacturer Specifications and Minimum Thickness Standards
Most brake manufacturers recommend that pads should be at least 1.5mm thick. Some high-end brakes need replacement at 2mm or more for best performance. Always check your brake model's specific guidelines.
Also, check for oil on the pads. Contaminated pads appear glossy or discolored and should be replaced immediately. Even a small amount of oil can damage the pads and significantly reduce braking power.
Hydraulic Brake Maintenance vs Mechanical Systems

Electric bicycles have two brake systems: hydraulic and mechanical. Each needs a special care for hydraulic brake maintenance and service. Knowing these differences helps you replace brakes right and keep your bike stopping well.
Hydraulic brakes use fluid lines to send force to the caliper. They stop better and feel smoother but need more care during checks. Mechanical brakes use cables to pull pads against the rotor. They're easier to adjust but need regular checks to keep the brakes working.
| Feature | Hydraulic Brakes | Mechanical Brakes |
|---|---|---|
| Maintenance Frequency | Every 6-12 months | Every 3-6 months |
| Disc Brake Pad Lifespan | 2,000-3,000 miles | 1,500-2,500 miles |
| Service Complexity | High (requires bleeding) | Low (cable adjustment) |
| Contamination Sensitivity | Very sensitive | Moderately sensitive |
| Average Service Cost | $40-80 | $20-40 |
When fixing hydraulic brakes, look for a spongy lever. This means air is in the lines and needs to be bled. Hydraulic calipers require careful adjustment when new pads are installed. Mechanical brakes are easier to fix with simple adjustments and pad alignment.
Maximizing Brake Pad Longevity and E-Bike Component Care
Caring for your e-bike's brakes is more than just replacing pads. With the right maintenance, your brake pads can last longer. This means your electric bike stays safe for years. Regular care and smart riding habits help avoid frequent repairs.
Proper Breaking-In Procedures for New Pads
New brake pads need a special break-in process. Start with 10 to 15 slow stops from 10-12 mph. Then, do 5 to 10 faster stops from 15-18 mph. This helps the pads bond with the rotor for better braking.
Riding Habits That Extend Brake Pad Lifespan
Your riding style affects brake pad life. Don't drag your brakes on long downslopes. Use motor resistance or pedal backward to slow down instead. This method reduces heat and wear.
Pad life varies with riding conditions. Urban riders on flat roads see longer pad life. Trail riders need balanced compounds. Heavy cargo or mountain trails require metallic pads for heat control.
Regular Cleaning and E-Bike Brake Adjustment Tips
Clean brake rotors monthly with isopropyl alcohol. This removes oil and dirt that can shorten pad life. Also, check pad thickness and adjust cable tension for consistent braking.
Common Mistakes to Avoid During Electric Bike Repair

Working on your e-bike's brakes needs careful attention. Many riders make mistakes that harm their bike's performance. Recognizing these mistakes helps keep your e-bike safe and in optimal condition.
Contamination Prevention for Optimal E-Bike Brake Performance
Contamination is the biggest brake enemy. Oil, grease, or other substances can ruin your brakes. They cause your e-bike's brakes to squeal and lose stopping power.
Always wear nitrile gloves when handling brake pads – your skin oils can harm them. Avoid using spray lubricants on brake parts. A little overspray can ruin new pads and start the whole process over again.
If your brakes become dirty, clean them with isopropyl alcohol and lightly sand them. Dirty rotors require a thorough cleaning with brake cleaner before adjusting your brakes.
Proper Torque Specifications and Installation Errors
Using incorrect torque values is extremely hazardous. Too tight can damage your brakes, too loose is unsafe. Always follow the manufacturer's torque values, usually 6-8 Nm for e-bike calipers.
Another big mistake is squeezing the brake lever without pads. This pushes pistons too far, causing big repairs. When installing, align the caliper right. Loosen bolts, squeeze the lever, then tighten while keeping pressure for perfect alignment.
Conclusion
Knowing when to replace your e-bike brake pads is key for safety. Regular checks can spot wear early. You can check pad thickness, listen for odd sounds, and feel for changes in stopping power.
DIY e-bike maintenance saves money and boosts your confidence. With basic tools, you can replace brake pads yourself. It takes about 30 minutes per wheel once you know how.
Your e-bike's brakes perform better with the right pads and care. Shimano, SRAM, and Magura make pads for heavy e-bikes. After installing new pads, bed them in with 20 to 30 controlled stops.
Good habits keep your e-bike safe and its parts lasting longer. Replace pads when they're 1.5mm thick or show uneven wear. Keep brake surfaces clean and store your e-bike in a dry place to prevent rust.
FAQ
How often should I check the thickness of my e-bike's brake pads?
It's best to check your brakes every few hundred miles. Look for brake pads that are at least 1.5mm thick. If you ride in hilly areas or carry heavy loads, check them more often.
What are the primary signs of brake pad wear that I should watch for?
Watch for pads that are less than 1.5mm thick, squealing sounds, or a spongy brake lever. Also, look for reduced stopping power and uneven wear. If pads are glazed or oily, replace them right away.
How much does DIY e-bike maintenance cost compared to professional service?
Basic tools for fixing your e-bike cost under $30. This includes hex keys, gloves, and a piston press. Shops charge $25-$ 50 per wheel, plus pad costs. DIY maintenance saves money and keeps your bike in good condition.
What's the difference between resin, metallic, and ceramic brake pads?
Resin pads are quiet, but they wear out quickly. Metallic pads last longer and handle heat better. Ceramic pads offer the best of both worlds, making them ideal for tough riding.
Do I need to bleed my hydraulic brakes when replacing pads?
Usually, you don't need to bleed the brakes just for pad replacement. But if the lever feels soft, you might need to. Bleeding is complex and best left to pros.
What are brake pad wear indicators, and how do they work?
Wear indicators are built into modern pads. They show when pads need to be replaced. Shimano recommends replacing the pads at 1.5mm. Park Tool suggests using a flashlight for a clear view.
How do I properly bed in new brake pads?
Bed-in new pads by slowing down 10-15 times at 10-12mph, then 5-10 times at 15-18mph. This ensures pads contact the rotor correctly, preventing squealing.
Can I clean contaminated brake pads instead of replacing them?
You can try cleaning glazed pads with rubbing alcohol and a sanding block. But pads with oil need to be replaced. Always wear gloves when handling pads.
What tools are needed for brake pad replacement?
You'll need hex keys, gloves, and a piston press or screwdriver. Also, have rubbing alcohol, rags, and needle-nose pliers. These tools help you maintain your e-bike at home.
How does e-bike weight affect brake pad longevity?
E-bikes' extra weight and speed wear out pads faster. Heavy riders on hills might need new pads every 500-700 miles. Lighter riders on flat ground might go over 2,000 miles. Regular checks are key to safety.
DISCLAIMER
This document is provided for general information purposes only and should not be relied upon as providing legal advice, technical, or specific operational guidance to the reader, whether as to the practices described in the document or the applicable legal requirements and regulations. justelectricbikes.com expressly disclaims any responsibility for liability arising from or related to the use or misuse of any information in this document.
